Beginner's guide to Arduino
Arduino Getting Started Tutorial
Introduction
Arduino is a very popular term you will find on the internet if you are an electronic hobbyist. Most people picture Arduino as that popular blue board (Arduino Uno) that is used in many projects. In fact Arduino goes way beyond that. Based on the Arduino website it is described as a platform. However I would describe it more as a very clever standard.
With the evolution of microcontrollers in the industrial world, hobbyists wanted to use them for their projects. If you do not know what a microcontroller is you can have a look here: Link. However getting into microcontrollers can be daunting as programming skills are required, hardware cost and software costs need to be considered.
The Arduino comes to the rescue by providing the advantages and bonus features below:
1) A single free and open source software easy to download and install.
2) A single standardized programming language that is easy to learn.
3) Standardized open source hardware available from Arduino and several clone manufacturers.
4) Free and easily available libraries on the web like GitHub.
5) Arduino shields that allow to add additional features by plugging additional boards.
We will explore each of these features are we dive into more details next.
Arduino Boards
Uno
Before you can get started with Arduino you will ned to choose an Arduino hardware. The most common hardware for learning and using Arduino, is the Uno. Several clones are available at low cost such as the one shown below. The Uno is an ideal board for a lot of projects ranging from simple to complex ones. The board plugs into a computer via a USB cord and nothing else is required to run and program the board. Additional connectors for DC and an external programmer are also provided. An Uno board contains around 20 pins and can store a program of up to about 32kB.

Mega
In case you are embarking on a complex project where you need more than 20 pins for connecting external devices and you need more than 32kB or program, the second choice is the Mega. A clone Mega is shown below that has more input pins on the board. Similar to the Uno it can be used with a USB cord plugged into a computer for running and programming the board. Connectors are also provided for external power and for connecting a programmer.

The Uno and the Mega are ideal boars for anyone getting started with Arduino.
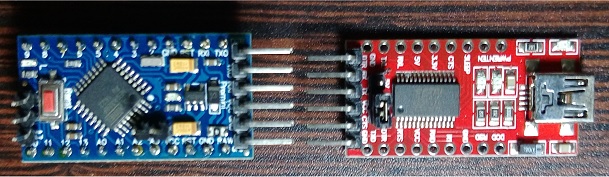
Nano
The Nano is another Aruino hardware. It is not recommended to be used as a learner board but rather in a final project. The Nano is the blue board shown on the left below and is about a quarter of the size of an Uno. Next to it is an example of an external programmer board which is required to write the software into the board as none is built into the Nano board. The main chip, program capacity and number of pins of the Nano is exactly the same as an Uno.
Arduino Boards
ESP8266
Aruino being an open source platform has allowed boards that do not typically fall under the Arduino umbrella to be used like Arduino's all by keeping their specific functionalities. An example is shown below which is the ESP8266 Node MCU. This board is a Wifi specialised micorocontroller which is used for Wifi specific applications. With the help of the Arduino community, this board can now easily programmed like a traditional Arduino. It still keeps its Wifi features which can also be accessed.

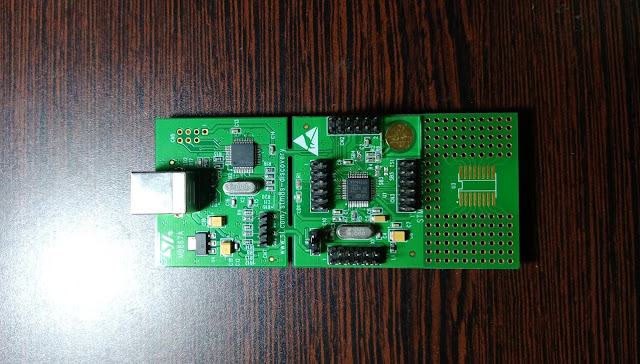
STM32F103C8T6
The STM32F103C8T6 board is an ST based microcontroller board widely available on the internet for cheap. It host a 32bit microcontroller with plenty of features including USB which the Arduino does not have. By adding a the proper libraries this board can be used like an Arduino.


Arduino Shields
Shields are add-on boards that plug into an Arduino. Shields are used when a specific functionality is required to be added to an Arduino which is not present. An example is provided below in the form of an SD Card shield.

Other types of shields exist that can provide audio, network, wifi, motor control and several additional features to an Arduino. You could connect these devices yourself to the Arduino but you would need to use wires and pay proper attention to connections. Make use of shields as often as required.
Arduino Software
Once an Arduino board has been chosen the next step requires getting the Arduino software. Go to http://www.arduino.cc and on the menu click on Software then Download. Look under Download the Arduino IDE and choose the appropriate version for your operating system.
Arduino Software installation
Depending on which operating system you are an installation might be required but it is really straightforward. Simply follow the installation wizard and you're done.
Arduino IDE loading a sketch
To launch the Arduino software look for the Arduino icon on your start menu. The IDE in the term stands for Integrated Development EnvironmentThe Arduino IDE will launch as shown below. The easiest way to see the arduino working is by clicking on the File menu choose Examples

Verifying a sketch
To verify a sketch click on the verify icon
Verification is about taking the code that was written and convert it into a format the Arduino hardware can understand. In case there are any errors it will get displayed.

Uploading a sketch
Uploading a sketch means writing compiled code into an Arduino. The Arduino needs to be connected to the computer and the code must have been verified successfully. Next simply click the upload icon


From the menu choose New Tab. New tabs are used in more complex project when code needs to be separated.


Arduino Software additional features
Adding a new tab
To add a new tab in the Arduino IDE. Simply go to the complete left and click the down symbol.From the menu choose New Tab. New tabs are used in more complex project when code needs to be separated.

Serial
monitor
The serial monitor tool in Arduino provides a display of information sent to the serial port in case it is being used in a project. An exmaple is shown below where analog information is being read by the Arduino and the Analog values are being sent to the serial port. the dec, hex, oct and bin symbols shown below are displaying the same information in different formats.

Serial plotter
The serial plotter is a graphical tool available in Arduino. It allows to display information as a graph. As for serial monitor, the serial port needs to be used and supplied with information for the Serial plotter to work. An example is shown below where the values sent by the serial port are displayed as green lines. The serial plotter automatically adds a line graph following each value being plotted.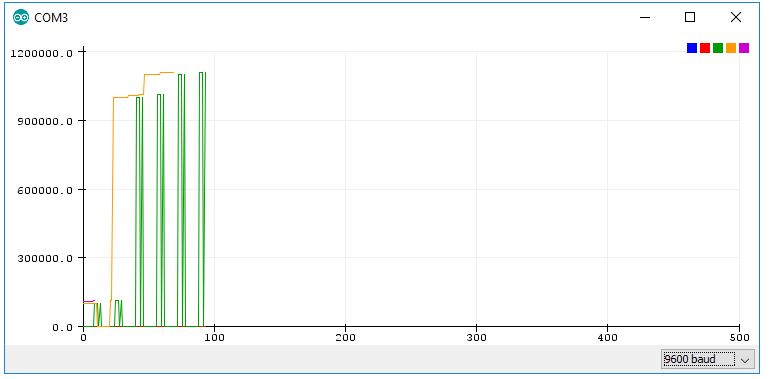
Adding a library to Arduino
Additional libraries can be added to the Arduino software to include additional functionalities which are not present by default. Libraries can also add all the support code needed to make a shield work. Libraries are pasted as a single folder under the windows user Documents->Arduino->Libraries folder.


I hope this post has shed a little more light on how you go about using Arduino. I stuck to the basic shere but in case you are interested in going further with Arduino's you can also deal with the Microcontroller directly and bypass the whole Arduino suite. Your solution is then to use Atmel Studio from Microchip. The downside is that you will need to learn a new way of coding which is completely different from Arduino. The positive side however is that you get full access to the hardware. When using the Arduino software, some timers are locked and cannot be access plus you cannot do any debugging with Arduino. Atmel Studio answers these questions brilliantly. In real field applications of Microcontrollers using the same chip as in on Arduino boards, enginners use Atmel Studio.
Thank you for reading my blog. Its always a pleasure for me to share my knowledge with everyone and ignite the passion that I have for Microcontrollers in other people. Any comments are welcome. Stay tuned for some more new posts. If you are interested in anything you would like to see or suggest, leave a comment in the comments section. See you soon.

Comments
Post a Comment