Introduction to Microcontrollers
Introduction to Microcontrollers
The purpose of this blog post is
to give readers an overview of working with Microcontrollers and successfully
implementing them in projects. There are numerous information on Microcontrollers
available out there but very few give a big picture of the implication of
building a project around them from beginning to end for people who have never
used them before.
What are Microcontrollers?
This is the first questions that
came to my mind when I first started to get involved with Microcontrollers,
what is a Microcontroller actually? In simple terms a Microcontroller is an
electronic device which is used to provide control signals to one or more
targets devices. The control signals can be used to do simple task such as
switch on a led, a relay or it can be a more complicated form of control signal
such as a serial protocol signal used to send data through a USB port for
instance.
In order to send the control
signals the Microcontroller has the ability to read input(directly or through
specialized devices), process them if required and in certain circumstances use
specialized internal/ external devices to generate the control signals.
To achieve the ability of
generating control signals, a set of instructions need to be programmed into
the Microcontroller.
A bit more on
control signals
Now some practical examples of
what you can do with Microcontrollers and their ability to generate control
signals(Not exhaustive):
Control
Signal
|
What can
you do with them?
|
Side Note
|
Power control(PWM)
|
Motor Control for robots and drones
|
External Motor Driver devices required
|
Power inverters(12V DC to 110/220V AC)
|
External power drivers required
|
|
Sound generation
|
Not hifi grade but usable for audible alerts
|
|
Audio applications
|
Send signals to specialized IC's to control
volume, tone or build a 5.1 or 7.1
|
Additional
external specialized ic required
|
Control DSPs(Digital signal processors)
|
Additional
External DSP device required
|
|
Digitally controlled equalizer
|
Additional
Digitally controlled equalizer ic required
|
|
FM tuner
|
Additional Digitally controlled FM receiver ic
required
|
|
Spectrum analyzer
|
Requires a powerful Microcontroller
|
|
FAT file system MP3 player(SD card, USB drive or
Parallel IDE hard disk)
|
Might require external decoder ic or decoding
done internally on Microcontroller. Use of proper external DAC recommended.
FAT library required. For usb drive USB host grade microcontroller required
|
|
Instrumentation
|
Function generator
|
Additional DDS ic or specialized function
generator ic required
|
PC based or standalone Oscilloscope
|
A very ambitious one but feasible with proper
external devices
|
|
PC based or stand alone logic analyzer
|
Another ambitious one but feasible with proper
external devices
|
|
Digitally controlled bench Power supply
|
Good quality external DAC required on top of
external power electronics
|
|
Data loggers to pc or FAT based storage
|
||
PCB building
|
PCB UV exposure timers
|
|
PCB etch temperature controllers
|
Use of PID logic recommended
|
|
SMD soldering oven temperature control
|
Use of PID logic recommended
|
|
Infrared Remote control
|
Receive or transmit infrared signals
|
Some Microcontrollers feature built in infrared
modules
|
What you see on the above list
are some examples of what can be done with Microcontrollers. The areas of
applications are actually wider than that. In commercial applications Microcontrollers
find their application in anywhere from consumer electronics to industrial
grade applications.
Working with Microcontrollers
let's get stated
Great now that you've had an idea
of how far a Microcontroller can be used let's go further on what we need to
put them to use.
Below is what you will need to
work with a Microcontroller:
1) The Microcontroller IC itself:
But shouldn't I consider a development board
first? That's a tricky one but let me explain. Normally whenever you are
building a Microcontroller based project you have to choose a Microcontroller
IC first. The reason being that the Microcontroller IC you will choose will be
the one sitting on your final circuit board with the other devices it will
control. Unless you are buying a development board to do a single one off
project I would highly recommend finding
the IC first. Below are some of the Microcontroller ICs that I use.

The next question that comes in
is how to choose this Microcontroller IC? First and foremost consider the
following:
i) What is/are the target devices
to be controlled?
ii) Is the use of specialized in
built modules required?
iii) How big is your program and is there enough Flash Memory on the device to hold
it?(More on this in simulation later)
iv) Are signal speeds/timing
extremely critical and can a Microcontroller handle it? In certain
circumstances you might need to revert to the use of CPLDs or FPGAs for
directly handling the signals with a Microcontroller. An extreme case is when
you might be building an oscilloscope or a memory controller. In those extreme
circumstances the Microcontroller serves the purpose of only sending control
signals to the CPLDs/FPGAs but not direct control of the target device itself.
v) What manufacturers build the Microcontroller
you have chosen and do they have microcontrollers that fall within you specs?
vi) Do you have access to the
selected Microcontroller support documents such as datasheet and the like?
vii) Last but not least is the Microcontroller(s)
you have chosen already available from your preferred online seller or local
seller? Is it in production or phased out? Is the price of the Microcontroller
within your budget or is it unaffordable?
As a simple guide my approach is
once I have decided on points i) to vi) above I go and look for the Microcontroller
online. In case it is not available (and will often be for newly launched
devices), I iterate back until I have reached a viable solution.
As you work with these devices,
you will get more familiar with certain brands and will tend to stick to them.
2) The development environment and the programming language
If you have settled with you Microcontroller
choice then comes the need to program it. There are two set of tools that are
needed to write code for a Microcontroller:
I) A development environment
The development environment is
where code is written. Most code written for Microcontrollers use C/C++ language. Some Microcontroller provide
a free development environment. you also have third party vendors that provide
a development environment for free or paid. How you feel at ease with the
development environment is up to you but you can go around downloading some and
give it a try
II) A compiler
The compiler is the program that
will take the code you have written and convert it into a form that's usable by
your Microcontroller. Some development environment feature built in full fledge
compilers for free, provide a time or code size limited compiler for free but a
paid version is required for full use. From my experience unless you are
building an extreme project, a code size limited version can be used for most
projects. The table below at time of writing gives a good idea.
Platform/Manufacturer
|
IDE
|
Compiler
|
Microchip
|
Free
|
XC compilers-code limited free, full version paid
|
Arduino
|
Free
|
Free
|
IAR embedded workbench
|
*Free
|
Code or time limited, full version paid
|
Mikroelectronica
|
*Free
|
Paid
|
ST
|
Free
|
Paid
|
Coocox
|
Free
|
*Free uses GCC compiler
|
TI
|
Third party both free and paid
|
FREE GCC others paid
|
Keil
|
*Paid
|
Paid
|
ATMEL
|
Free
|
*Free uses GCC compiler
|
An important note here, the above
is only provided as a rough guide based on information freely available on the
net. This being said, as you see the world is not as simple as it seems but the
choice is yours. In case you are embarking on a commercial project my advice is
to go with the paid solutions as they feature more support and less time to
market. In case you are a DIYer s a limited or fee version can do the job. You
will also notice there is more paid in the compiler column than the IDE one.
The reason behind being that it's the compiler that actually does the delicate
job or converting your source code and also optimizing it for use on your Microcontroller.
3) The programmer
If you have reached this step it
means your Microcontroller is settled and thankfully your development
environment and compiler as well. Now once you have finished writing your code,
how do you get it into your Microcontroller? Well you need a programmer. What's
the programmer? It's simply a hardware that you can purchase that connects to
your pc through a port. Most often these days most programmers connect through
a USB port. The programmer next connects to your Microcontroller through
dedicated pins. From your development environment or an additional software you
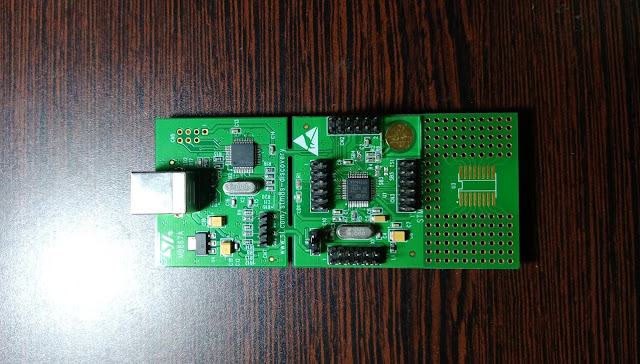
will be able to press a button that will send the compiled code to you Microcontroller. Below are some examples of programmers:

As you can notice both devices
feature a USB port and a special connector for the Microcontroller IC. There
are some manufacturer specific programmers, clone programmers and universal
ones.
4) The development board
At last we get there. The
development board is actually a printed circuited board that contains your chosen
microcontroller. The development board can be used for placing connecting wires
going to other add on modules or shields as they are called. The advantage of a
development board is that the code can be sent to the microcontroller with a
programmer without having to solder or setup basic connections. It also serves
as a first level prototype that can give an idea of how the project is turning
out. But as you get my point about the microcontroller IC I stated above this
is just a prototype not your final circuit.
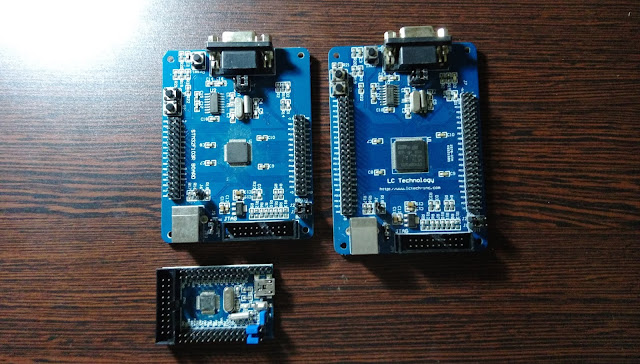
Development boards can be
purchased direct from manufacturers. Below are two of them. some development
boards also feature a build in programmer. Sometime the programmer is hard wired to the microcontroller
and cannot be used elsewhere sometimes they have jumpers that can be used to
turn them into a standalone programmer. some newer versions even have slots in the
board where the programmer board can be snapped off.

In case you feel that manufacturer
development boards are too expensive, an alternative is what I would call
"OEM development boards". You
can find these easily online at smaller prices. Just be careful of the build quality
sometimes the board costs the same price as a microcontroller and you might
have ICs that were sent off the QC test to land onto those boards, but they do
work well enough for prototyping.

In case you are feeling
adventurous you can build your own development board. It's a cheaper alternative
you will need to read the microcontroller datasheet to understand where power
goes, what pins need bypassing, where the crystal oscillator goes e.t.c. You
will also need a good PCB design software, proper power, signal and ground
plane routing as is the case usually when designing a PCB. don't let yourself
scared by SMD's they are just a package and a lot of people have been able to
successfully design their own development boards with them.

It is to note as well that there
as a lot of development packages available online that come with plenty of add
on boards or have devices prebuilt. These boards are a very nice option in case
you want to focus on learning all the aspect related to microcontrollers.
Finalizing your
project
Once you are done with testing
your code with your prototype its normally time to go for the final version. In
case you are happy and everything works as expected you can start designing the
final PCB. Actually in practice I have not been so lucky mostly in cases where
I was building something complex. There have always been two issues I ended up
facing most of the time:
i) Vibration, noise and stability
As I mentioned before, using
development boars might require the use of wires and sometimes breadboard to
connect to other devices. Very often it can be a headache as you are working
and probing the circuit. Wires move, get disconnected accidentally. You hit the
table and all the wires vibrate sending chaos to your circuit.
Another point is the signal
frequency used by microcontrollers. For certain projects I had signals running
as low as 2MHz to reaching nearly 100MHz and above. As such high frequencies
using connecting wires can cause EMI to flow around. Breadboard is another
source of high capacitance that in certain circumstances can be a pain to
control. A simple case, you want to flash a led, fine no issues. Try to control
a CPLD from a microcontroller and the CPLD in turn is controls a static RAM IC
with thresholds going above 100MHz to sample live signals is a nightmare with
connecting wires. Sometimes the connecting wires themselves can grow huge in
number.
ii) Power supply and stability
Very often most programmers can
supply the required voltages to a microcontroller. This can be set through the
development environment.
Some development boards also
feature power through a USB cable, external wall adapters or simply a proper
power supply.

I have always had the experience
of things working nicely at this stage. But when I would power the device from
outside i.e. with its target power source, it was a different picture. I had
automatic power resets or false reads. Properly designing and bypassing the
power supply that will power the final device is critical may it be battery
operated or mains operated.
I would also advise to have a
separate power line for the microcontroller and or additional digital devices.
Powering microcontrollers from analog supply is something I would not recommend
for signal integrity. Additionally make use of external regulators. Although
some microcontrollers feature built in voltage regulators don't solely rely on
them.
The cleaner your microcontroller
power supply is the cleaner your control signals will be. This being said
without going to extremes, like building a Class A amp grade power supply for a
microcontroller.
So how to get things cleaner with
signaling and power supply? Well the answer that helped me a lot was to first
design the PCB and then build a version of the PCB using project board with all
the connections properly soldered. An example is shown below:

The above is an example prototype
I used. After having tested all the aspects of the circuit with my development
board, I built a first version of this board to test everything. The microcontroller
is housed below the lcd display. A supply cap and regulator is visible bottom
left and the rest is next to the microcontroller pins below the lcd. It was
only through this circuit that I was able to stabilize my signals and corrected
power supply related problems. Some signal lines also had to be re routed.
Conclusion
I hope this article has been able
to help shed some light on microcontrollers and how you use them and the
process involved. I know some people get scared or run away from microcontrollers
because it seems like a beast to daunt in itself. The subject does require some
time and patience but you will surely get there. Microcontrollers are there and
improving everyday and being able to use such fantastic devices in your
projects can only mean you can build more interesting and ambitious projects.
Copyright © Introduction to Microcontrollers 2016. All Rights Reserved. Reproduction or usage of content prohibited unless approved and agreed by blog author.

Comments
Post a Comment