Beginner's Guide to PIC Microcontrollers
Introduction to PIC Microcontrollers
Introduction
PIC Microcontrollers have been the very first microcontrollers I worked with. I started with the venerable 16F84 and I have worked with a lot of other PIC devices since then. The aim here like my other posts is to give an idea of the implication of working with such devices.So basically what is a PIC Microcontroller, well its another microcontroller available on the market made by Microchip. PIC Microcontrollers are available in a wide variety of offerings namely 8bit, 16 bit or also called DSPIC and 32 bit. Don't get scared here on the number of bits they are actually the size of instruction that the microcontrollers can process. 8bit microcontrollers are out there and performing very complicated tasks. Microchip enhances all their portfolio offerings regularly to make sure their microcontrollers keep up to the job.
From a hobbyist point of view there seems to be some models which are very popular mainly the through hole packages which are easier to implement on breadboard or pcb. The good news also and you will see it below is that using one IDE you will be able to code all the microcontrollers offered by Microchip.
Tools needed to build a project for a PIC Microcontroller
Part 1 The Hardware
The hardware required can be classified into two commercial offerings mainly: Microchip hardware and clones. That means basically you can get Microchip development boards and Microchip programmers. You can also get OEM development boards as well as clone programmers. If you are thinking of industrial applications and going commercial with your microcontroller product the Microchip hardware is a worth investment. If you are a hobbyist and on a budget with a lot of care you can get a good clone, but there are special offers from time to time from Microchip and you can get your hands on Microchip hardware for a good price.So first the board, below are some board offerings you can get from Microchip

Second option you have what I call OEM boards. The offers differ. You can get boards as simple as the one you see below this can be used as a development board or as the final board for a project. Just hook the connections and you are ready to go.

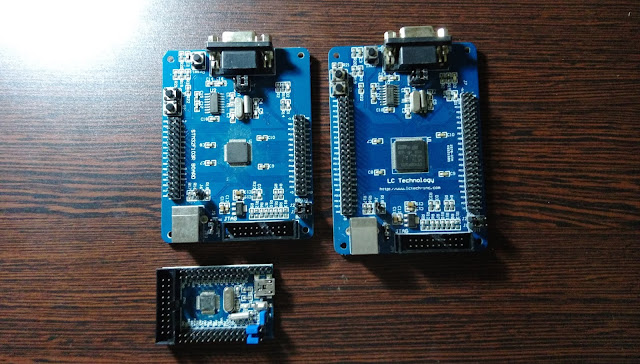
Third option you have what I can call the learning boards like the one you see below. These are great if you want to focus on learning and not spend your time soldering or building additional pcbs for your external hardware. You can get these in different offerings i.e. as a whole packages with everything you see or the main board only. the boards with pins are sometime called breakout boards and come with specialized devices that can do Wi-Fi or mp3 decoding for example.

A fourth option is MikroElektronika boards. I think they deserve an attention of their own. MikroElektronika makes learning boards based on pic microcontrollers amongst their offerings. They have taken a lot of time to design an build their boards. Note that their boards come with a built in programmer. They also have an IDE and compiler of their own. This board is just beautiful.

Fifth options is to build your own board. I have not mentioned this option in my post on STM32 as they come as SMD and it might be scary for a novice to work with. However in case you are dealing with a through hole PIC Microcontroller you can easily build your own board either by making your own PCB or soldering everything on a protoboard. You can see two examples below, just keep your copper track routings short and clean if you are going this way.


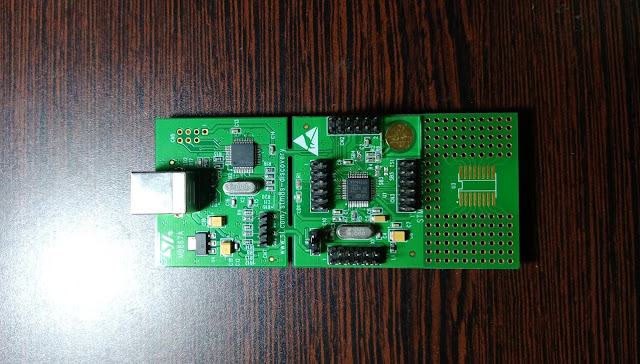
Last and final option is project board. You can see an example below. You can easily use the through hole Microcontrollers on a project board. To achieve that you need to check the datasheet for the minimum connections, namely VSS,VDD, MCLR and programmer pins. Its a quick and cheap option to get you going.
Below is a picture of a Pickit3 and an ICD3. The ICD stands for in circuit debugger. The ICD is more expensive, has more features its up to you to choose. Bear in mind that the Pickit3 also has debugging features built in its just a question of which PIC microcontroller model you are working with.


The clone offerings also work well but you need to be careful when buying them. Below is a clone PIckit3 programmer.

Part 2 The Software
You will need two software to be able to work with your PIC Microcontroller
1) A development environment to write your code
2) A compiler to convert your code into a format that can be programmed into your PIC
In case you are going with Microchip boards, your own home made development board or OEM boards then the choice is simple. Go for Microchip MPLabX IDE. MPLabX IDE is a mature product which is provided free by Microchip. Its available for Mac and Linux as well. The interesting point about MPLabX Ide is that it is constantly updated by Microchip. The IDE at the time of writing does not yet have an autoupdate check feature so make sure you go to Microchip's website from time to time to check for updates. Whether you are a diyer or an industry specialist MPLabX IDE is th one to go for.

However there is an exception here. In case you have bought a board from Mikroelektonika they do have their own IDE. Its the easiest way here as the IDE readily recognizes the Mikroelektronika board you are working with.
Second thing on your list is the compiler. The choice again here is quite limited. If your IDE is MpLabX then your choice is to go for a Microchip compiler. The Microchip's compilers are brabded MPLab XC compilers. The XC compilers are available in two broad offerings:
1) Free non optimized versions
2) Paid Standard and PRO versions the PRO offering highest level of optimization.
But wait what does the optimization really mean? To put it in simple words, any microcontroller has an amount of program memory which is like it name states is there to store a compiled format of your code or program. The free versions of MPLab XC compilers will attempt a very minor amount of optimization to your code, the result is that it consumes a lot of program memory. You can easily reach a point where the compiled version of your code does not fit at all into the program memory. If you reach that stage you have only two options: either you find a PIC Microcontroller with a greater amount of program memory or you buy a paid compiler version which does better optimization for code size.
In case you are a diyer I would recommend the free versions to start with you can do quite a bit with that for example flash leds, learn serial protocols, use the PIC built in modules one at a time. You can later upgrade to a standard version as the need arises and you build more complicated projects. In case you are going into commercial applications and you want to avoid headaches I would recommend the PRO version straight away. Do keep in mind that Microchip does have special offers and rebates on their compilers, you can keep an eye out for these when considering to purchase a compiler.
Another information which might be good to know is that any free version of MpLab XC compiler allows you to switch on a 60 day limited version of the PRO edition. This feature can be nice to evaluate any feature of the PRO edition before purchasing.
If you are going with Mikroelektronika boards then you will need to consider their compilers, mikroC being the most popular. The only downside here is that there is no free version available. They offer a single purchase version only. However if you consider the price of mikroC you are talking double digit dollars here versus triple digit dollars for an MPLab XC PRO compiler.

Comments
Post a Comment