Beginner's Guide to STM8
Introduction
The STM8 series of 8 bit microcontrollers are made by ST. The STM8 micorocontrollers have seen their price dramatically reduced by ST and can be easily found on sites like Ebay and Ali Express. They are quite poweful but unfortunately there are very few online resources to help anyone get started. I will share the information i have gathered while i worked with these devices.
Development board
If you have been reading some of my earlier posts you will have noticed that in order to work with microcontrollers you will need a development board and a programmer. The development board is similar to what's commonly called an Arduino but in our case with an STM8 in it. The programmer can be purchaed and it required to write all your code into the microcontroller. Below are some example of each
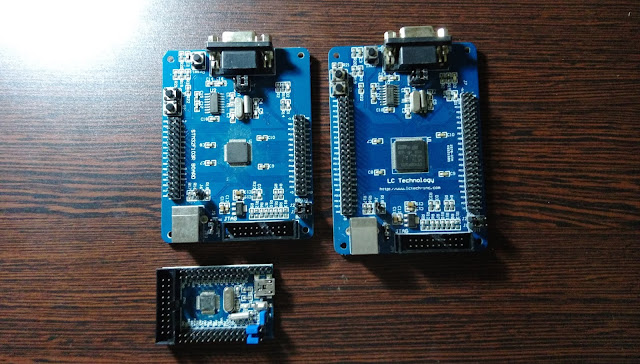
The picture below shows a development board that can be purchased easily online. the board is called STM8 Discovery. If you are getting started with STM8 and you wish to do a lot of things, including testing all possibilities the microcontroller has to offer, go for this board. It also has the convenience of containing an onbaord programmer. All you need to do is plug an USB cable from your conmouter into the board are you are ready to go. More complex versions of STM8 boards are also made by ST such as the STM8/128 EVAL at a much higher cost. The only point about this board is that some configurations are made by solder bridge and you will need a soldering to do or undo them. Proceed with care if you venture into this as the solder bridges are at SMD dimensions, 0402 if i am correct.

Another option for a development board is to build your own. the picture below shows one possible way of doing this. The STM8 is sitting on the green LQFP48 adapter. These boards are readily available in batches of 5 or more online. To build a board like this you need to look at the datasheet to find your way out. Soldering the STM8 is not that complex just make sure you have practiced SMD soldering before and you have adequate equipment at hand. I have not used professional soldering irons here but all my soldering equipment came from Ebay and Ali Express. If you have access to better quality equipment you should be able to do the soldering more easily.

Programmer
To write code into the STM8 you will need a programmer. Below is a ST-Link V1 programmer that i bought a long time back and i still use today. You can get these programmers very easily almost anywhere online.

Clone programmers can also be found online very easily such as the one below. Its a clone of a STLink V2 and it works quite well.

Software
In order to write code for the STM8 software is required. Several options are possible. Below are the ones that I use currently:
STM8 Standard Peripheral Library
The STM8 Standard Peripheral Library is a package that is freely available from ST. The package will simplify access to the the complex structure of the STM8 internals. In order to be able to download the package you will need to create a free account with ST.

STM8 standard peripheral library comes as a zip file. Once downloaded extract the contents and you should have a folder similar to the one below

The most important files are located under the Libraries folder inside the inc and src folders.

Setting up an easy to use folder template
If you have followed my previous post on Beginner's guide to STM32 you should recognize the foldr structure below. Each of the blue boxes is a folder. The Inc and Src folders below are copied from the STM8 standard peripheral libraries mentioned above. Every time I work on a new project I copy and paste the folder structure below. I the rename the Template folder as per what I am working on.

STM8 Cosmic
A first piece of software that you require is STM8 Cosmic which is a compiler provided by Cosmic Software. Head to their website and register for an account. The STM8 cosmic is provided free of charge but with a free yearly renewal license. Once you have registered, download an install the software.
NOTE: After installing STM8 Cosmic you will need to register the compiler and wait to receive an activation key from Comic software by mail. You will need to repeat this process once a year on the same date you installed your STM8 Cosmic.
NOTE: After installing STM8 Cosmic you will need to register the compiler and wait to receive an activation key from Comic software by mail. You will need to repeat this process once a year on the same date you installed your STM8 Cosmic.
ST Visual Develop
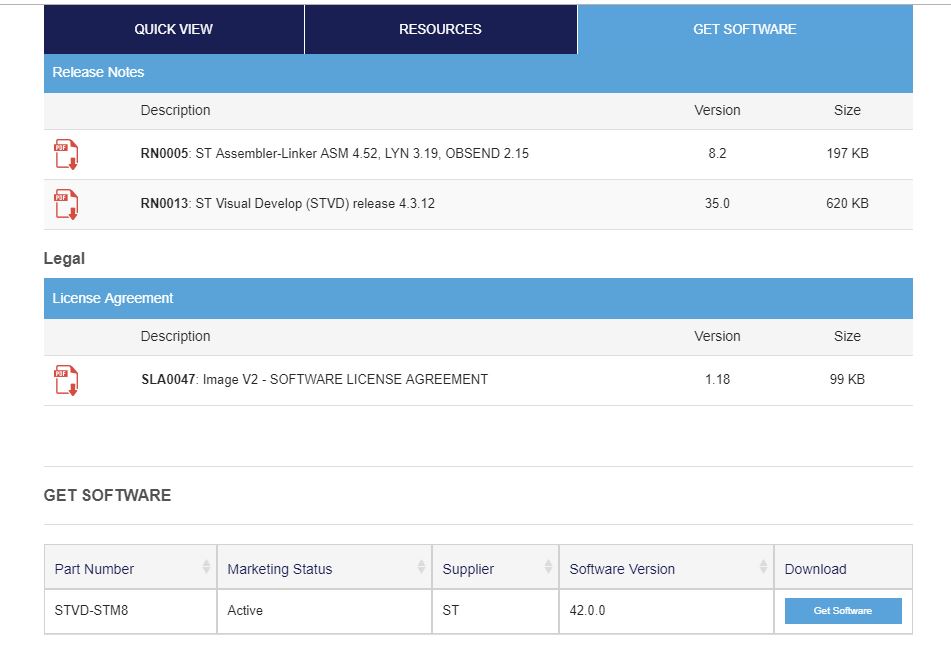
In order to write code for the STM8 you will need an IDE. ST provides an IDE called ST Visual Develop free of charge. First you will need to register and account with ST. Next search for ST Visual Develop on their website. Once the Software license agreement is accepted just click Get Software to download the IDE. Once the download is complete install the software.
Writing code for the STM8
Once ST Visual develop and STM8 Cosmic have been setup, the next step is to write code for the STM8.
Creating a new workspace
The first thing you will need to do to write code is to create a workspace. Launch ST Visual Develop and on the File menu click on New Workspace...

A wizard will pop up to guide you through the steps to create a workspace. First you will need to select your target STM8, in my case I will be working with an STM8S105C6. Once chosen click Select and click OK.

Next give a name to the Workspace and choose a location to save the workplace.

Next you will be required to provide a name for the project and provide a location to save the project. The project can be saved under the workspace specified in the previous step.
The Toolchain part is very important it connects the compiler to ST Visual develop. Since we went for STM8 Cosmic the choice is obvious and the Toolchain root is where the compiler is installed.

Once the above steps are completed you should find yourself with the display shown below. However the aim is to reflect the folder structure we did before inside ST Visual Develop.

To reflect the folder structure that was used before we need to create folders. To create a folder right click on the project and select New Folder...
To add files to a folder right click on the folder and select Add Files to Project
To add files to a folder right click on the folder and select Add Files to Project

Give the folder a name and click OK

Produce the folder structure shown below and add the files as shown.

Next we will need to change some configurations. Click on Project then Settings

A screen as shown below will. On the General Tab check the tick box next to Project specific toolset path

Next click on the Compiler tab change the Optimizations section as required. The default option is Disable for Debugging(-no) which can be used to tune the code. When you are ready to deploy your finalized code choose between Maximize execution speed or Minimize code size (+compact) or Customize. A Word of advice here always recheck all your functionalities for any of the options you have chosen I have found myself changing options in certain circumstances due to erratic code behavior.

Next go to the Assembler tab. Set the Preprocessor Definitions as well as User Defined Options as per highlighted below. Click on OK to continue.

Next go to the Inc folder and open the stm8s.h folder. You will need to uncomment the line which corresponds to you microconttoller in my current case I am using an STM8S105

Two more steps to go until we finish with the configuration. Go to the STM8_interrupt_vector.c and add the following line inside #include "stm8s.h".
The lines 14 to 18 will also need to be commented as shown below.
The lines 14 to 18 will also need to be commented as shown below.

Next go to your main.c file and add the following line shown below. You can exclude the comments.

Once you are done save everything and on your menu locate the Compile icon shown below. Click on the icon to compile the code. In case any errors are displayed they will need to be fixed.

Next locate the Build icon an click on it. All your code will be built to be ready to be transferred to your microcontroller.

The first step in transferring code to the STM8 is to connect the programmer and the board if needed. Then click on Tools->Programmer

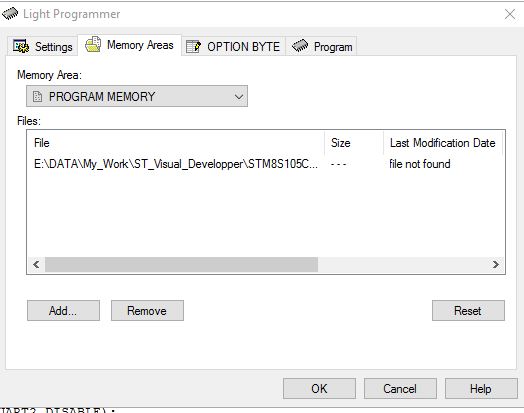
The screen shown below will appear next.

Click on Memory Areas tab. Below Memory Area: select Program Memory.
Click the Add button and browse to the debug folder of your project and choose the .S19 file.
Remove any file which says file not found and click Ok
Next in case you wish to change specific port Alternate Function click on the OPTION BYTE tab. Right-click the port and select which function to activate. Click ok to finish

The last step is to go to the Program tab and click Start

If everything is fine the code should get programmed into the microcontroller successfully.
I hope you have found this post interesting and successful. Please share and comment. If you want to see more specific microcontroller blogs, please let me know in the comments. Until next time happy microcontroller programming.

Comments
Post a Comment